It's surprising what you find when you start digging around in old pattern puzzle files. This second version of the Wrap Layer Top has remained buried for over six years. The first version can be found here: Wrap Layer Top #1.
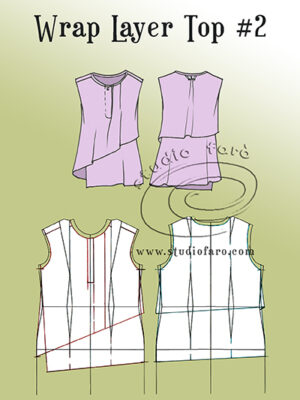
For #2 the pattern plan, featured in the above image, is based on my fitted dress block. You'll see that the asymmetric nature of the design means you'll have to to trace out a full front and full back dress block to work on this design.
Planning out your pattern:
- I generally start at the top of the pattern around the shoulder or neckline. Move the neckline out from the neck point (NP) on the front and back by 1-1.5cm (⅜-⅝"). Then drop the CF and CB neck by the same amount.
- Move the shoulder seam forward form the back to the front by 1.5-2cm (⅝-¾").
- Mark-up the first front layer from left to right taking the shape outside the body fit of the dress block.
- Then mark-up the under-layer just below the hip line, slightly higher on the left side than the right. Note the right side runs from the side seam at the waist in a straight line to the hem.
- On the front bodice there are two tucks, one below the centre tab and the other on the left side of the garment.
- Adjust the front and back armholes for a sleeveless style by taking off 1cm (⅜") at the shoulder point (SP) and the underarm point through to 0cm (0") at the waist.
- Mark-up the asymmetric layers in the back bodice to link through from front layers as indicated in the pattern plan.
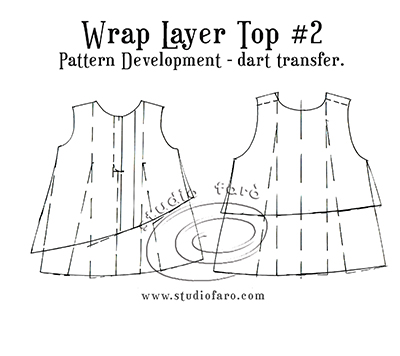
For the dart transfer part of the pattern development:
- Close the front bust dart (the one located int he shoulder) and send it through to the hemline of both layers.
- Close the back shoulder dart and send it through to the hemline of both layers on the back.
- To shift the shoulder line forward, remove the small portion from the front and add it to the back shoulder line.
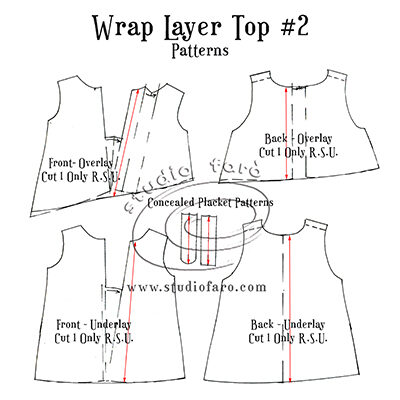
For the final pattern:
- Separate the top and under layers for the front and back patterns.
- Add the two tucks into the top layer of the front. Add the placket tuck only to the front under-layer.
- On the back add an inverted pleat to the centre back line of the top layer only.
- Trace your front tab shape and make the two tab patterns as folded pieces.
- Cut a bias bind pattern piece to finish off the neckline and armholes.
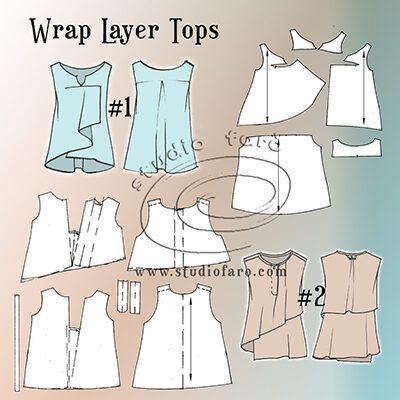
The image above has sketches and pattern pieces for both Wrap Layer Tops. If you have questions feel free to comment below or jump across to my facebook group (STUDIO FARO MAKERS) and share your photos and questions. :)
If you'd like to buy a copy of these pattern making notes for your own personal use at home you'll find them here: Wrap Layer Tops - Pattern Making Instructions
Gracias, es un bonito modelo y su explicación muy clara.
ReplyDeleteThank you Maria. :)
Delete